When your water heater gives off foul odors or produces discolored water, it may be time to call for a professional. Minor repairs can provide better value than a replacement unit if it’s still within its expected lifetime.
However, the average cost to replace certain parts can add up quickly. Read on Hot Water Now CO to learn about the most common Water Heater Repair costs.
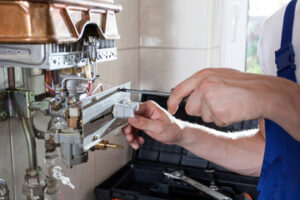
A thermostat is an extremely small component that is vital to your hot water heater. Without a functioning one, your home can experience all sorts of unpleasant issues such as little to no hot water, scalding water, and leaking run-off tubes. If you have noticed any of these issues, it is likely time to call in a professional for water heater repair.
The first sign that your thermostat may be malfunctioning is if you notice an inconsistent water temperature. Often, hot water can be lukewarm in one moment and then scalding the next. This is because a damaged thermostat can’t properly relay the desired temperature to the heating element.
In most cases, you can tell if your thermostat is broken by examining its digital display. If it seems to be switching between different temperatures, it could be that your thermostat has a fault in its microcontroller or the Thermistor. The microcontroller is the part of the thermostat that reads the resistance the Thermistor gives off, and then translates that into an actual temperature. The thermostat then activates the HVAC system if that number matches the number on the display.
Another sign that your thermostat is broken is if you notice a spike in your energy bills. This is because a thermostat that isn’t working properly will switch on and off frequently, which uses more electricity than necessary. If you’ve noticed your utility bills increasing significantly, it is a good idea to contact a plumber to check the thermostat.
There are a few different ways to fix a thermostat, depending on the type of thermostat you have. Most modern water heaters have electrical thermostats that use internal electronics to activate the system. These electrical systems usually have what is called a magnetic latching relay. This relay hovers over two contacts that, when supplied with an electrical pulse, cause it to close and activate the HVAC system.
For older thermostats, the process is a bit more complicated. These old-school models rely on a thermometer to sense the water temperature and then send that information to an electrical circuit hooked up to the system. Thermostats that rely on this type of technology have two strips of different metals that are bolted together and then coiled around the water heater. These thermometers, known as bimetallic strips, have a tendency to bend when the water is too hot because they expand at different rates. To prevent this from happening, you can wrap the thermostat in Teflon tape (also called thread seal or plumber’s tape).
Pilot Light
The pilot light is a small flame that ignites the gas in your water heater to create warmth. When the pilot light goes out, you’ll have no hot water until it’s relit. Most manufacturers provide relighting instructions fastened to the appliance, but you can also try this basic method for many models:
First, shut off your gas to prevent a potential explosion. You’ll find a small gas regulator valve at the base of your unit. Turn it to the “Off” position and wait a few minutes so any residual gas can clear from the pipe.
Next, remove the access panel to reach your gas water heater’s pilot light. You may be able to snap it off or screw it off, depending on your model. You’ll then need to find the pilot light, which is usually a blue flame inside the burner holder. Be careful not to touch the flame because it’s very hot!
A thermocouple is attached to the pilot flame and generates a tiny electricity each time the pilot light is lit. This electricity then runs to a small electromagnetic valve and holds it open when the pilot light is burning. When the flame is extinguished, the thermocouple cools and the valve closes.
Several things can cause the pilot light to go out, including problems with the thermocouple and clogged pilot orifices. If you suspect your water heater has an issue with the thermocouple, it’s best to call in a professional for an accurate diagnosis and a quality repair.
If you notice a strong gas smell, leave the area immediately since you could have a gas leak. You should also contact your utility company for assistance since they can help you restore the flow of gas to your home.
Gas Burner
Gas water heaters use burners at the bottom of the tank to heat up your hot water. When this system stops working properly, you’ll often get no hot water or a hissing sound around the appliance. This usually means that your pilot light has gone out or the gas valve is malfunctioning. To check this, a plumber will turn off the water and power to your heater and then open the access panel or glass screen on the front of the unit. If the light is out, they’ll relight it by using either a knob or a pilot button that’s found under the gas valve.
If the light keeps going out, there could be dirt or debris clogging the unit’s burner orifice. This can prevent oxygen from reaching the flame, so a professional will remove the orifice and clean it out. They may also check the fuel line for proper gas pressure.
Newer gas water heaters can use either a flame sensor or a thermocouple to trigger the ignition. Both systems are usually reliable, but dirt or debris can clog them and prevent your heater from heating up. Your technician will remove the sensor and clean it out, as well as the burner assembly if necessary.
Both electric and gas water heaters need a temperature-pressure relief valve to protect the appliance from overheating. If this valve isn’t functioning correctly, it can release steam and hot water into your home, causing damage. A plumbing expert can replace this valve quickly and inexpensively.
The most important reason to hire a plumber for water heater repair is that they’ll be able to accurately diagnose the problem. They’ll understand the specifics of your system, including its voltage, the amount of sediment in your tank and the age of your burners or elements. This will help them provide you with an accurate quote, so there are no surprises when it comes time to pay the bill. In addition, plumbing experts have the tools and experience needed to work safely in high-pressure and hot environments. This will ensure that the job is done right and avoid costly repairs in the future.
Anode Tube
The anode rod is a long metal rod that runs down the center of the water heater tank. Typically, anode rods are made of magnesium or aluminum wrapped around a steel wire core. They are not permanent and require replacement periodically. The anode rod acts as a sacrificial anode that sacrifices itself to protect the interior of the water heater tank from corrosion.
The sacrificial anode rod gradually corrodes in order to serve its purpose and needs to be replaced periodically to avoid destroying the tank itself. This process is slower in cold water than hot water, but the sacrificial rod can still be depleted before it is time to replace it. Generally, the anode rod lasts for two to three years, but the actual length of time will vary depending on the hardness and composition of your water.
A common sign that the anode rod is corroding and needs to be replaced is a rotten egg smell in your hot water. This odor is caused by hydrogen sulfide gas that is produced when the anode rod corrodes. Another telltale sign is a white substance on the surface of the anode rod, which is calcium carbonate that has formed. This calcium is harmless and should simply be wiped off with a cloth or towel.
To change the anode rod, first shut off power and water to the tank. You will also need to drain a little water from the tank in order to prevent overflowing when removing or replacing the anode rod. Open a hot water tap in your home to relieve pressure in the tank, or connect a garden hose to the drainage valve at the bottom of the tank and drain a few gallons.
Locate the anode rod head and use a wrench to loosen it from its mounting spot on the top of the water heater. Once you can remove the anode rod, look at its condition to determine if it is corroded or rusty. Replace the anode rod with a new one and tighten it using the socket wrench. Adding a plastic cap over the anode rod head will help protect it from the elements.